
'스프링 환경설정'에 해당되는 글 2건
- 2017.02.15 :: 스프링 프로젝트-스프링 환경설정
- 2017.02.01 :: 스프링 프로젝트-개발환경 구성(Eclipse + JDK + Tomcat)
스프링 환경설정
바로 코딩을 시작할 줄 알았는데...
또 환경설정을 해야되냐구요?
지금까지는 개발을 위한 환경구성에 초점이 맞춰졌다면, 이제는 웹과 스프링 프레임워크 사용을 위한 기본 설정파일에 대한 설정과 설명을 하고 개발로 넘어가야 할 것 같아서... 몇 가지 준비했습니다.
web.xml [배포 서술자 : (DD, Deployment Descriptor)]
웹 애플리케이션의 기본적인 설정을 기술하는 파일입니다.
기본적인 설정이라 함은 filter, listener, servlet, session 등을 설정하는 것입니다.
web.xml 설정과 설명
1 2 3 4 5 6 7 8 9 10 11 12 13 14 15 16 17 18 19 20 21 22 23 24 25 26 27 28 29 30 31 32 33 34 35 36 37 38 39 40 41 42 43 44 45 46 47 48 49 50 51 52 53 54 55 56 57 58 59 60 61 62 63 64 65 66 67 68 69 70 71 | <?xml version="1.0" encoding="UTF-8"?> <web-app version="2.5" xmlns="http://java.sun.com/xml/ns/javaee" xmlns:xsi="http://www.w3.org/2001/XMLSchema-instance" xsi:schemaLocation="http://java.sun.com/xml/ns/javaee http://java.sun.com/xml/ns/javaee/web-app_2_5.xsd"> <!-- 웹 애플리케이션 이름 정의 --> <display-name>myapp</display-name> <!-- filter 설정 추가 --> <!-- filter : Client와 Servlet Containder 사이에서 HTTP 요청/응답을 변경할 수 있는 재사용 코드 --> <filter> <filter-name>encodingFilter</filter-name> <filter-class>org.springframework.web.filter.CharacterEncodingFilter</filter-class> <init-param> <param-name>encoding</param-name> <param-value>utf-8</param-value> </init-param> </filter> <filter-mapping> <filter-name>encodingFilter</filter-name> <url-pattern>/*</url-pattern> </filter-mapping> <!-- The definition of the Root Spring Container shared by all Servlets and Filters --> <!-- ContextLoaderListener가 사용할 설정파일 위치 변경 --> <context-param> <param-name>contextConfigLocation</param-name> <param-value>/WEB-INF/spring/root-context.xml</param-value> </context-param> <!-- Creates the Spring Container shared by all Servlets and Filters --> <!-- listener 설정 --> <!-- listener : 루트 웹 애플리케이션 컨텍스트를 등록할 때 사용 웹 애플리케이션의 시작과 종료 시 발생하는 이벤트를 처리하는 listener인 ServletContextListener를 구현한 ContextLoaderListener가 웹 애플리케이션이 시작될 때 root application context를 생성 및 초기화하고, 웹 애플리케이션이 종료될 때 context를 종료하는 기능을 담당한다. --> <!-- 별다른 설정을 하지 않고 아래처럼 listener를 정의하면 /WEB-INF/applicationContext.xml 파일을 디폴트 설정파일로 사용한다. 설정파일의 위치는 <context-param> 항목을 이용해 변경할 수 있다. 위의 <context-param> 항목을 참조! --> <listener> <listener-class>org.springframework.web.context.ContextLoaderListener</listener-class> </listener> <!-- Processes application requests --> <!-- 서블릿 설정과 서블릿 애플리케이션 컨텍스트 등록 --> <!-- DispatcherServlet이 초기화될 때 자신만의 컨텍스트를 생성 및 초기화한다. 그리고 웹 애플리케이션 레벨에 등록된 루트 웹 애플리케이션 컨텍스트를 찾아서 자신의 부모 컨텍스트로 사용한다. --> <servlet> <servlet-name>appServlet</servlet-name> <servlet-class>org.springframework.web.servlet.DispatcherServlet</servlet-class> <!-- DispatcherServlet의 컨텍스트에 대한 디폴트 설정을 변경하고 싶다면 아래와 같이 contextConfigLocation을 정의하여 경로를 설정하면 된다. --> <init-param> <param-name>contextConfigLocation</param-name> <param-value>/WEB-INF/spring/appServlet/servlet-context.xml</param-value> </init-param> <load-on-startup>1</load-on-startup> </servlet> <servlet-mapping> <servlet-name>appServlet</servlet-name> <url-pattern>/</url-pattern> </servlet-mapping> </web-app> | cs |
servelt-context.xml 설정과 설명(child context)
1 2 3 4 5 6 7 8 9 10 11 12 13 14 15 16 17 18 19 20 21 22 23 24 25 26 27 28 29 30 31 32 33 34 35 36 37 38 39 40 41 42 43 44 45 46 47 48 49 | <?xml version="1.0" encoding="UTF-8"?> <beans:beans xmlns="http://www.springframework.org/schema/mvc" xmlns:xsi="http://www.w3.org/2001/XMLSchema-instance" xmlns:beans="http://www.springframework.org/schema/beans" xmlns:context="http://www.springframework.org/schema/context" xsi:schemaLocation="http://www.springframework.org/schema/mvc http://www.springframework.org/schema/mvc/spring-mvc.xsd http://www.springframework.org/schema/beans http://www.springframework.org/schema/beans/spring-beans.xsd http://www.springframework.org/schema/context http://www.springframework.org/schema/context/spring-context.xsd"> <!-- DispatcherServlet Context: defines this servlet's request-processing infrastructure --> <!-- Enables the Spring MVC @Controller programming model --> <!-- 1. RequestMappingHandlerMapping bean등록(기존 DefaultAnnotationHandlerMapping) 2. RequestMappingHandlerAdapter bean등록(기존 AnnotationMethodHandlerAdapter) : customArgumentResolvers, customReturnValueHandlers 추가 가능 3. JSR-303의 검증용 어노테이션(@Valid)를 사용할 수 있도록 LocalValidatorFactoryBean bean설정 (JSR-303지원 라이브러리 존재 시) 4. RequestMappingHandlerAdapter의 messageConverters프로퍼티로 메시지 컨버터들 등록 주의사항 <mvc:annotation-driven>을 사용할 때는 직접 RequestMappingHandlerAdapter를 등록해주어서는 안되며 직접 등록이 필요한 경우에는 <mvc:annotation-driven>을 설정하지 않고 각각의 필요한 설정을 수동으로 해주어야 한다. --> <annotation-driven /> <!-- @Controller, @Repository, @Service, @Component 스트레오타입 어노테이션이 선언된 클래스를 빈으로 등록한다. --> <context:component-scan base-package="com.devdic.board"/> <!-- Handles HTTP GET requests for /resources/** by efficiently serving up static resources in the ${webappRoot}/resources directory --> <resources mapping="/resources/**" location="/resources/" /> <!-- Resolves views selected for rendering by @Controllers to .jsp resources in the /WEB-INF/views directory --> <!-- InternalResourceViewResolver는 웹 어플리케이션 컨텍스트에 존재하는 템플릿에게 랜더링에 대한 책임을 위임하는 View 객체를 논리적인 View 이름을 사용하여 결정한다. View 객체는 기본적으로 InternalResourceViewResolver이며, 이 객체는 실제 랜더링을 수행할 JSP에 단순히 요청을 전달하는 일을 한다. 만약 JSTL 태그를 사용한다면 viewClass 특성을 설정함으로써 InternalResourceView를 JstlView로 대체하여 JstlView 요청을 JSP에 전달한다. --> <beans:bean id="viewResolver" class="org.springframework.web.servlet.view.InternalResourceViewResolver"> <beans:property name="viewClass" value="org.springframework.web.servlet.view.JstlView"/> <!-- JSP파일 경로와 접미어 설정 --> <beans:property name="prefix" value="/WEB-INF/views/"/> <beans:property name="suffix" value=".jsp" /> </beans:bean> </beans:beans> | cs |
root-context.xml 설정과 설명(parent context)
<context~> 항목을 사용하기 위해 네임스페이스를 추가하셔야 합니다.
아래코드에서 굵은 글씨로 된 부분을 추가하시면 됩니다.
1 2 3 4 5 6 7 8 9 10 11 12 13 14 15 16 17 18 19 | <?xml version="1.0" encoding="UTF-8"?> <beans xmlns="http://www.springframework.org/schema/beans" xmlns:xsi="http://www.w3.org/2001/XMLSchema-instance" xmlns:context="http://www.springframework.org/schema/context" xsi:schemaLocation="http://www.springframework.org/schema/beans http://www.springframework.org/schema/beans/spring-beans.xsd http://www.springframework.org/schema/context http://www.springframework.org/schema/context/spring-context.xsd"> <!-- @Service, @Repository 스트레오타입 어노테이션이 선언된 클래스를 빈으로 등록한다. --> <context:component-scan base-package="com.devdic.board"> <context:include-filter type="annotation" expression="org.springframework.stereotype.Service"/> <context:include-filter type="annotation" expression="org.springframework.stereotype.Repository"/> <context:exclude-filter type="annotation" expression="org.springframework.stereotype.Controller"/> </context:component-scan> <context:annotation-config/> </beans> | cs |
기본적인 설정은 어느정도 된것 같습니다.
DB연결을 위한 datasource, JDBC를 좀 더 쉽게 사용하기 위한 Mybatis연동, 논리적 작업단위의 Transaction 설정 등 몇가지가 남았지만...
잠시 뒤로 미루어두고 공지사항 등록 화면을 만들어보죠~~~
'프로그래밍' 카테고리의 다른 글
| 스프링 프로젝트 - 공지사항 Request 처리를 위한 환경설정 (0) | 2017.02.21 |
|---|---|
| 스프링 프로젝트-공지사항 등록 화면 구현 (0) | 2017.02.17 |
| 스프링 프로젝트-프로젝트 생성 (0) | 2017.02.08 |
| 스프링 프로젝트-개발환경 구성(Eclipse 환결설정 및 플러그인) (0) | 2017.02.07 |
| 스프링 프로젝트-개발환경 구성(Eclipse + JDK + Tomcat) (0) | 2017.02.01 |
개발환경 구성(Eclipse + JDK + Tomcat)
IDE : Eclipse Neon
JDK : 1.8
Tomcat : 8.0
웹 개발 입문자도 천천히 따라할 수 있도록 개발환경 구성 및 설정 부터 웹 개발에 필요한 많은 기능(지식)이 포함된 공지사항 기능구현까지 몇 회에 걸쳐 작성하도록 하겠습니다.
그럼 첫 단계로 [웹 환경의 이해1] 과 [웹 환경의 이해2] 글에서 집중 설명된
Application Tier에 대한 개발환경 구성을 시작할까요?
1. 환경구성에 필요한 SW 다운로드
◈ Eclipse 다운로드(SW 개발을 쉽게 할 수 있도록 도와주는 통합개발환경 툴)
zip파일 및 exe(설치형) 파일 형식 중 아무거나 다운로드 하시면 되요! 참고로 저는 zip파일 형식으로 다운로 할게요~
설치할 컴퓨터의 OS와 비트를 확인 후 다운로드 하세요~
다른 버전을 다운로드 받으려면 MORE DOWNLOADS 메뉴를 이용하시면 됩니다.

◈ JDK 다운로드(JAVA로 SW를 개발하기 위한 JVM(플랫폼 독립성 확보), JRE(실행환경), 각종 API 등 제공)
JDK 다운로드 사이트로 이동하여 JDK를 다운로드 합니다.(이클립스와 동일하게 자신의 OS에 맞는 버전을 다운로드~)
참고로 이클립스 네온을 사용하려면 자바 8버전 이상이 필요합니다.

마우스 스크롤을 내리면 Java Archive라는 내용이 보이고 "DOWNLOAD"라는 버튼을 클릭하면 다른 버전의 JDK도 다운로드 받을 수 있습니다.

◈ Apache Tomcat 다운로드(Web Server, WAS(Servlet 컨테이너) 역할)
저는 8.0버전을 다운로드 하였습니다.
zip파일 및 exe(설치형) 파일 둘 중 아무거나 선택하시면 됩니다. 저는 조금은 개발자 스러운 zip파일 형식으로^^

2. 개발환경 구성(압출풀기 및 설치)
- 개발환경 구성을 위한 폴더를 하나 생성 합니다.
- 저는 devdic이라는 폴더명으로 만들었습니다.
- 개발에 필요한 SW를 한곳에 통합함으로써 관리 및 개발환경 공유가 쉬워지는 장점이 있습니다.
- 아래의 그림 [개발환경 폴더 구성]처럼 하는 것이 목표입니다.

[개발환경 폴더 구성]
◈ Eclipse 압축풀기
- 새로만든 폴더(devdic) 아래에서 압축을 풀어줍니다.
- 그러면, devdic\eclipse\~의 형태로 구성됩니다.
◈ JDK 설치
- 다운로드 받은" jdk-8u121-windows-x64.exe" 파일을 실행합니다.
- 아래의 그림[JDK 설치] 처럼 설치 PATH를 변경해 주세요!


[JDK 설치]
◈ Apache Tomcat 압출풀기
- 새로만든 폴더(devdic)의 tomcat폴더 아래로 압축을 풀어줍니다.
- 그러면, devdic\tomcat\~의 형태로 구성됩니다.

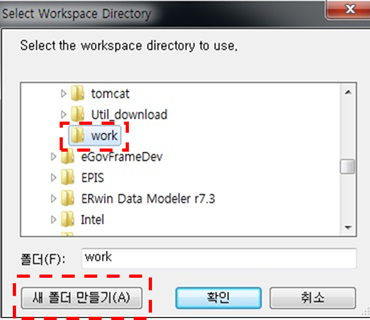
지금 설정한 경로를 기본경로로 사용하고 다시 물을건지에 대한 옵션을 선택한 후 "OK" 버튼을 클릭합니다.

아래와 같은 그림이 나오면 정상적으로 eclipse가 구동이 된 것입니다.

웹 프로그램 개발을 위한 Application Layer의 필수 SW는 설치가 되었으니 Eclipse 플러그인 설치 및 환경설정/연동 단계로 넘어 갈까요?
'프로그래밍' 카테고리의 다른 글
| 스프링 프로젝트 - 공지사항 Request 처리를 위한 환경설정 (0) | 2017.02.21 |
|---|---|
| 스프링 프로젝트-공지사항 등록 화면 구현 (0) | 2017.02.17 |
| 스프링 프로젝트-스프링 환경설정 (0) | 2017.02.15 |
| 스프링 프로젝트-프로젝트 생성 (0) | 2017.02.08 |
| 스프링 프로젝트-개발환경 구성(Eclipse 환결설정 및 플러그인) (0) | 2017.02.07 |